Pistachio Dream Cookie Bars
Pistachio Dream Cookie Bars: A Layered Green Delight
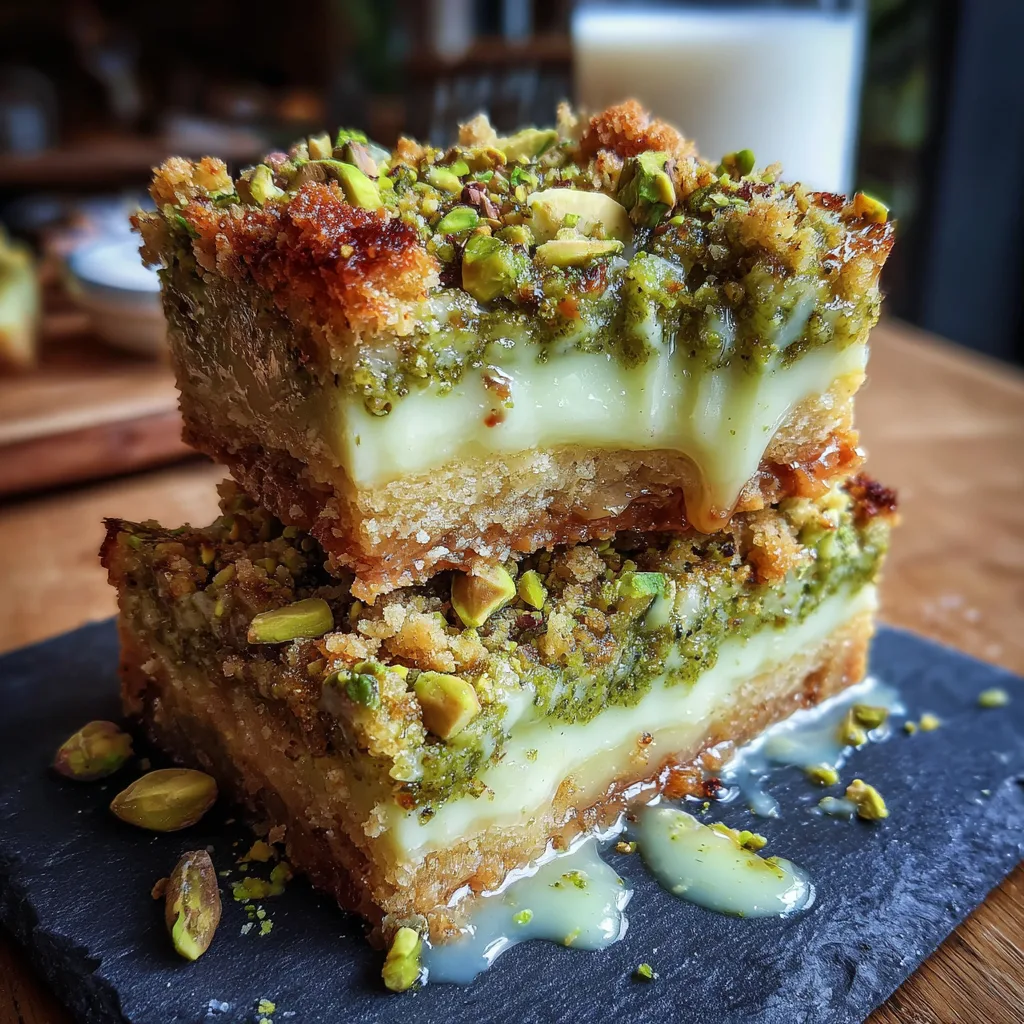
If you are a lover of the humble pistachio, prepare to meet your new obsession. These Pistachio Dream Cookie Bars are a dessert that defies the ordinary. They are not quite a cookie, not quite a cheesecake, and not quite a pie—they are a magnificent hybrid of all three. Imagine a buttery, melt-in-your-mouth shortbread crust, topped with a silky, vibrant green pistachio cream filling, and finished with a crunchy, nutty crumble. Every bite is a journey through texture and flavor, from the sandy crunch of the base to the velvety smoothness of the center.
There is something undeniably elegant about pistachio desserts. Their natural pastel green hue makes them perfect for spring gatherings, St. Patrick’s Day celebrations, or Christmas cookie exchanges. But unlike complex French pastries that require hours of labor, these bars come together with the ease of a simple traybake. The “dream” in the name isn’t hyperbole; the filling has a cloud-like consistency that feels luxurious on the palate, while the nutty crunch keeps it grounded and satisfying. If you have been searching for a dessert that looks like it came from a boutique bakery but was actually whipped up in your pajamas, this is it.
Why You Will Love This Recipe
Texture Heaven: The contrast is the star of the show here. You get the firm, buttery bite of the cookie base, the luscious, cool creaminess of the pistachio layer, and the erratic crunch of chopped nuts and crumble on top.
Visual Appeal: We eat with our eyes first, and these bars are stunners. The layers create a beautiful cross-section that looks professional and appetizing. The pop of green is natural and inviting.
Versatility: These bars travel exceptionally well. Because they are baked as a solid tray and then chilled, they are sturdy enough to be packed in tin boxes for gifts or transported to potlucks without falling apart.
The “Pistachio” Factor: Pistachios have a unique flavor profile—slightly savory, earthy, and sweet. This recipe amplifies that flavor using both real nuts and pudding mix to ensure every bite screams “pistachio.”
Ingredients
To achieve the perfect balance of flavor and structure, we use a mix of pantry staples and specific flavoring agents. Do not skimp on the butter; it is the backbone of the crust!
The Buttery Cookie Crust & Topping
- Unsalted Butter – 1 cup (2 sticks), softened. Using unsalted allows you to control the sodium level, which is important in sweet baking.
- All-Purpose Flour – 2 cups. The structural foundation of the shortbread.
- Brown Sugar – 1/2 cup, packed. Brown sugar adds moisture and a hint of molasses flavor that pairs beautifully with nuts.
- Salt – 1/2 tsp. Essential to cut the sweetness and pop the nutty flavors.
- Shelled Pistachios – 1 cup, finely chopped. These will be divided between the crust/topping mix to ensure crunch in every layer.
The Creamy Pistachio Filling
- Cream Cheese – 8 oz, softened to room temperature. This provides the tang and the creamy body of the filling.
- Granulated Sugar – 1/2 cup. To sweeten the cream cheese base.
- Instant Pistachio Pudding Mix – 1 box (3.4 oz). This is the secret weapon! It provides stability, color, and that nostalgic pistachio flavor.
- Eggs – 2 large. These bind the filling, allowing it to set into a sliceable custard-like layer.
- Milk – 2 tbsp. Just enough to help the pudding mix dissolve and smooth out the batter.
- Almond Extract – 1/2 tsp (optional). Almond flavor enhances pistachio flavor significantly; they are flavor cousins!
- Green Food Coloring – 1-2 drops (optional). If you want that vibrant “bakery style” green, a tiny drop helps, but the pudding mix usually provides a nice pastel shade.
Instructions
This recipe uses a “reserve” method for the crust and topping, meaning you make one dough and use it in two ways. It saves time and dishes!
Pistachio Dream Cookie Bars
Ingredients
Equipment
Method
- Preheat oven to 350°F (175°C). Line a 9×9 inch baking pan with parchment paper.
- Beat butter and brown sugar until smooth. Mix in flour, salt, and 3/4 cup chopped pistachios until a crumbly dough forms.
- Press 2/3 of the dough firmly into the bottom of the pan. Bake for 10-12 minutes until lightly set.
- Meanwhile, beat cream cheese and granulated sugar until smooth.
- Add dry pudding mix, eggs, milk, and almond extract to the cream cheese. Beat until thick and creamy.
- Pour filling over the hot crust and spread evenly.
- Crumble the remaining dough over the top and sprinkle with remaining pistachios.
- Bake for 25-30 minutes until filling is set and topping is golden. Cool completely, then chill for 2 hours before cutting.
Notes
Step 1: Prep and Preheat
Preheat your oven to 350°F (175°C). Line a 9×9 inch baking pan with parchment paper, leaving an overhang on the sides. This “sling” will make it incredibly easy to lift the bars out later for perfect slicing.
Step 2: Make the Crust Mixture
In a large bowl (or stand mixer), beat the softened butter and brown sugar until creamy and smooth. You don’t need to whip it to death, just combine well.
Gradually add the flour and salt. Mix on low speed until the dough starts to come together. It will look crumbly at first—keep mixing until it looks like wet sand or coarse crumbs.
Stir in 3/4 cup of the chopped pistachios (save the rest for the very top). The dough should hold together when squeezed in your hand.
Step 3: Pre-Bake the Base
Take about 2/3 of your crumb mixture and dump it into the prepared baking pan. Using the bottom of a measuring cup or a glass, press the crumbs firmly and evenly into the bottom to create a solid crust.
Bake the crust for 10-12 minutes. It should be just starting to look set and pale golden. Remove from the oven, but leave the oven on.
Step 4: Prepare the Pistachio Filling
While the crust is baking, make the filling. In a medium bowl, beat the softened cream cheese and granulated sugar until smooth and lump-free.
Add the dry pistachio pudding mix (do not make the pudding first!), eggs, milk, and almond extract. Beat until the mixture is thick, creamy, and uniform in color. Scrape down the sides of the bowl to ensure everything is incorporated.
Step 5: Assemble and Bake
Pour the green pistachio filling over the hot, pre-baked crust. Use a spatula to spread it into an even layer, reaching all the corners.
Take the remaining 1/3 of the crumb mixture and crumble it over the top of the green filling. Sprinkle the remaining 1/4 cup of chopped pistachios over the top for extra visual appeal and crunch.
Return the pan to the oven and bake for 25-30 minutes. You want the filling to be set (it should jiggle slightly in the center like a cheesecake) and the crumble topping to be lightly golden brown.
Step 6: Cool and Chill
This is the hardest part: waiting. Let the bars cool completely in the pan on a wire rack (about 1 hour). Then, transfer the pan to the refrigerator and chill for at least 2 hours. This step is mandatory! The chilling sets the cream cheese and pudding layer, making it possible to cut clean, beautiful squares.
Once chilled, lift the bars out using the parchment overhang and cut into squares.
Tips for Bakery-Quality Bars
The Parchment Sling: I cannot stress this enough—do not skip lining the pan. If you bake directly in the metal or glass pan, the first slice will be a sacrificial mess. The paper allows you to lift the whole block out and cut it on a cutting board.
Room Temperature Ingredients: Ensure your cream cheese and eggs are at room temperature. If the cream cheese is cold, it will leave tiny white lumps in your green filling, ruining that silky texture we want.
Chopping Pistachios: If you buy salted pistachios, rinse them quickly and dry them, or reduce the salt in the crust recipe. The salt on the nuts can be overpowering in a sweet dessert.
Clean Cuts: To get those sharp, professional edges seen in the photos, wipe your knife with a warm, damp cloth between each cut.
Variations to Try
White Chocolate Drizzle: Melt 1/2 cup of white chocolate chips and drizzle it over the cooled bars. White chocolate and pistachio are a classic flavor pairing.
The “Lush” Style: If you prefer a no-bake filling, you can bake the crust fully, let it cool, and then fill it with a mixture of whipped topping (Cool Whip) folded into prepared pistachio pudding. However, the baked cheesecake version in this recipe is richer and holds up better.
Cranberry Pistachio: For a festive Christmas version, mix 1/2 cup of dried cranberries into the crumble topping. The red and green contrast is stunning.
Coconut Twist: Add 1/2 cup of shredded coconut to the crust mixture. Coconut adds a chewy texture that complements the nutty pistachio perfectly.
Serving Suggestions
These bars are rich, so small squares go a long way.
- With Coffee: The nutty notes in the bars pair exceptionally well with a dark roast coffee or a latte.
- Dessert Platter: Serve alongside lemon bars and brownies for a colorful dessert trio.
- Ice Cream Sundae: crumble a warm bar over vanilla bean ice cream for an indulgent sundae base.
Storage and Freezing
Refrigerator: Because of the cream cheese and egg filling, these bars must be stored in the fridge. They will keep in an airtight container for up to 5 days.
Freezer: These bars freeze beautifully! Wrap individual squares in plastic wrap and then place them in a freezer bag. They can be frozen for up to 3 months. Thaw in the refrigerator overnight or on the counter for 20 minutes before eating.
The History of the Pistachio Dessert
Pistachios have been cultivated in the Middle East for thousands of years, often associated with royalty and luxury (the Queen of Sheba reportedly decreed pistachios were an exclusively royal food!). In American baking, the “pistachio dessert” boom really took off in the mid-20th century with the invention of instant pudding mixes. Suddenly, the complex flavor of pistachio was accessible to every home cook.
Recipes like “Watergate Salad” popularized the use of green pistachio pudding in sweets. These Cookie Bars are a modern evolution of that trend—moving away from gelatinous salads and towards sophisticated, texturally complex baked goods that honor the nut while embracing the convenience of modern ingredients.
So preheat that oven and get ready to create a tray of pure green envy. These Pistachio Dream Cookie Bars are waiting to become your family’s new favorite tradition.