The Ultimate No-Bake Biscoff “Cheesecake” Cups: A Layered Caramel Delight
Introduction: The Unstoppable Biscoff Obsession
In the expansive and ever-evolving world of desserts, certain flavor profiles capture the collective imagination of home bakers and professional pastry chefs alike. Right now, there is perhaps no ingredient more universally beloved and versatile than Lotus Biscoff. What began as a humble, individually wrapped complementary cookie served alongside coffee in European cafes has transformed into a global culinary phenomenon. From massive, towering layer cakes to rich milkshakes and delicate pastries, the deeply spiced, caramelized flavor of Biscoff—also known generally as speculoos—has proven its staying power.
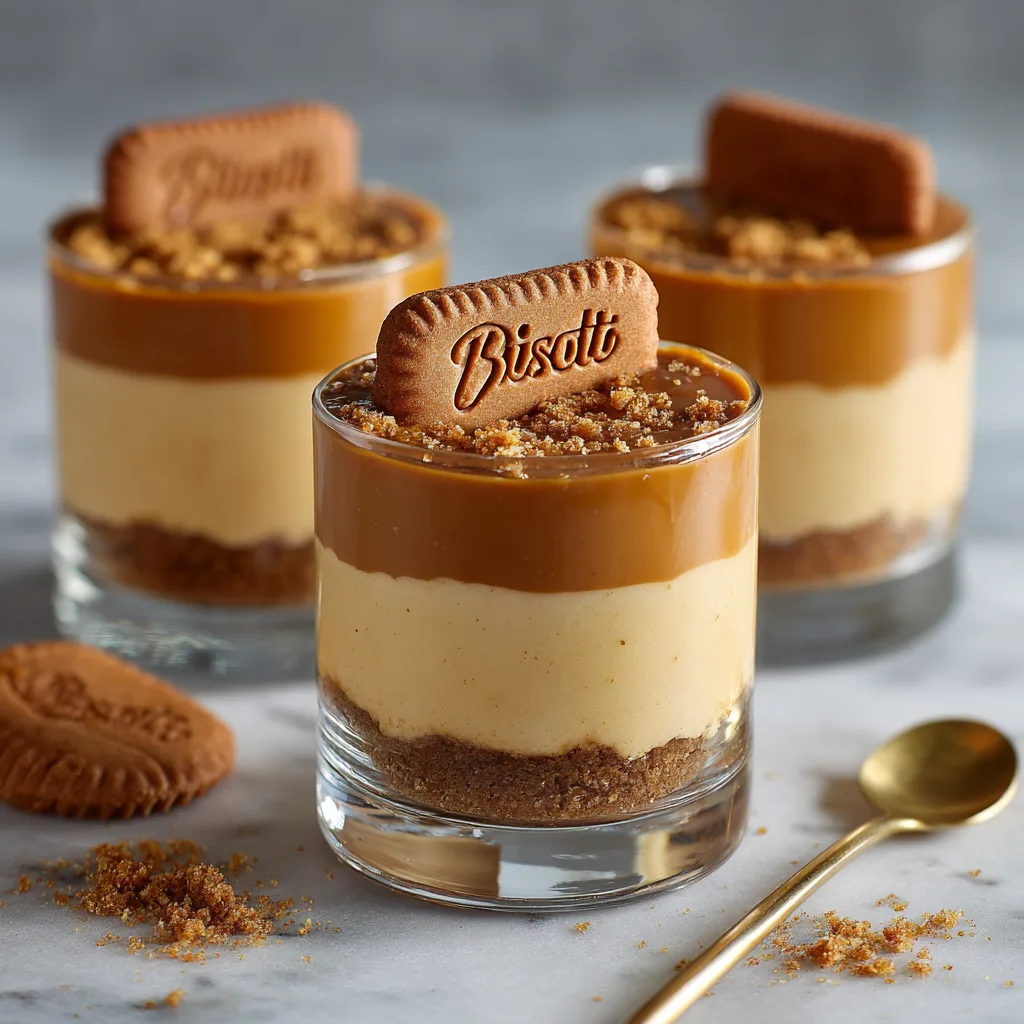
However, you do not need to be a professionally trained pastry chef with hours of free time to harness the magic of this incredible ingredient. Enter the No-Bake Biscoff “Cheesecake” Cups. This dessert is the absolute perfect marriage of convenience, elegance, and mind-blowing flavor. By deconstructing a traditional baked cheesecake and translating it into individual, no-bake portions served in elegant glasses, you eliminate the stress of water baths, the fear of cracked tops, and the agonizingly long baking and cooling times. Instead, you are rewarded with stunning, perfectly portioned parfaits that feature a buttery cookie crust, an impossibly light and airy cookie butter cheesecake mousse, and a decadent, glossy layer of melted Biscoff spread on top.
Whether you are hosting an elegant dinner party, putting together a casual weekend barbecue, or simply satisfying a powerful late-night sweet tooth, these Biscoff “Cheesecake” Cups are guaranteed to be the star of the show. In this comprehensive guide, we will explore the science behind setting a no-bake cheesecake without gelatin, the fascinating history of the speculoos flavor profile, and the exact step-by-step techniques required to master this recipe in your own kitchen.
What Exactly is Biscoff? Understanding the Flavor Profile
To truly appreciate this dessert, it is helpful to understand the star ingredient. Lotus Biscoff is a specific commercial brand of a traditional Belgian biscuit known as speculoos (or speculaas in the Netherlands). Historically, these spiced shortcrust biscuits were baked primarily around St. Nicholas Day in early December. The flavor profile is characterized by a distinctive blend of warm spices—most notably cinnamon, nutmeg, cloves, ginger, and cardamom—combined with a deep, dark caramel note derived from European brown sugar or beet sugar.
The name “Biscoff” itself is a portmanteau created by the Lotus Bakeries brand, combining “Biscuit” and “Coffee,” highlighting the cookie’s intended purpose as the ultimate coffee companion. The magic truly happened, however, when the company decided to grind these beloved cookies down and blend them with vegetable oils to create “cookie butter”—a spread with the textural consistency of creamy peanut butter but the exact, unadulterated flavor of the spiced biscuits. It is this cookie butter that provides the rich, velvety flavor base for our cheesecake filling and the luxurious, glossy topping of our dessert cups.
Why Choose Individual No-Bake Dessert Cups?
The decision to make these cheesecakes in individual cups rather than a traditional springform pan is not merely aesthetic; it offers several distinct culinary and practical advantages.
First and foremost is texture. A traditional baked cheesecake relies on the coagulation of eggs to set the filling, resulting in a dense, rich, and heavy slice. A no-bake cheesecake, particularly this recipe, relies on the aeration of whipped heavy cream folded into a cream cheese base. This creates a texture that is much closer to a light, heavenly mousse. Serving this soft, delicate mixture in individual glasses means you do not have to worry about the dessert being firm enough to slice cleanly. The glass supports the delicate structure, allowing for a softer, creamier eating experience.
Secondly, portion control and presentation. There is an undeniable elegance to a layered dessert presented in a beautiful glass tumbler or a small mason jar. Each guest receives their own perfect ratio of crunchy crust, creamy filling, and smooth topping. There is no messy slicing, no fighting over the crust, and the visual impact of the distinct caramel and cream layers is striking.
Finally, convenience. Traditional cheesecakes can take upwards of 8 to 12 hours of total time including baking, gradual cooling, and overnight chilling. These Biscoff cups can be assembled in roughly 20 minutes and require only an hour or two of chilling in the refrigerator to achieve the perfect consistency.
Equipment You Will Need
One of the joys of this recipe is its simplicity. You do not need any specialized or expensive pastry equipment.
- Electric Mixer: A hand mixer or a stand mixer fitted with a whisk attachment is highly recommended for whipping the heavy cream to stiff peaks and beating the cream cheese mixture until smooth.
- Food Processor: For quickly and evenly crushing the Biscoff cookies into fine crumbs. (If you don’t have one, a zip-top bag and a rolling pin work just as well!)
- Mixing Bowls: You will need at least two—one for whipping the cream, and one for the cream cheese mixture.
- Serving Glasses: Six small, clear glasses. Stemless wine glasses, small tumblers, or ½-pint mason jars are all excellent choices.
- Piping Bag (Optional): While you can easily spoon the filling into the cups, using a piping bag (or a large zip-top bag with the corner snipped off) makes for a much cleaner, neater presentation and prevents the filling from smearing on the sides of the glass.
Ingredients Breakdown
Because this dessert requires no cooking, the quality of your raw ingredients will directly dictate the final flavor of the dish.
- Lotus Biscoff Cookies (About 20-25 cookies): These will be pulverized to form the buttery, spiced crust at the bottom of the cups. You will also want a few extra for garnishing the finished desserts.
- Unsalted Butter (4 tablespoons, melted): The binder that turns the cookie crumbs into a cohesive crust. Always use unsalted butter so you can control the sodium level of your dessert.
- Full-Fat Cream Cheese (16 oz, softened to room temperature): The tangy backbone of the cheesecake filling. Crucial tip: Do not use low-fat cream cheese or cream cheese spread from a tub. They have a higher water content and will result in a runny, soupy filling. Use the full-fat blocks, and ensure they are very soft before mixing to avoid lumps.
- Biscoff Cookie Butter Spread (1 cup total): You will use 1/2 cup blended into the cheesecake filling to flavor it, and another 1/2 cup melted for the glossy top layer. Smooth cookie butter is preferred over the crunchy variety for the sleekest texture.
- Powdered Sugar (1/2 cup): Sweetens the filling. Powdered sugar (confectioners’ sugar) is essential here because it dissolves instantly into the cold mixture, whereas granulated sugar would leave a gritty texture. It also contains a small amount of cornstarch which helps stabilize the filling.
- Vanilla Extract (1 teaspoon): Enhances the caramel and spice notes of the cookie butter.
- Heavy Whipping Cream (1 cup, very cold): This is what gives the no-bake cheesecake its signature mousse-like texture. It must be cold to whip properly into stiff peaks. Do not substitute half-and-half or milk; they do not have enough milk fat to hold air.
Step-by-Step Instructions
- Prepare the Crust: Place the Biscoff cookies into the bowl of a food processor and pulse until they resemble fine, sandy crumbs. Pour the melted butter over the crumbs and pulse a few more times until the mixture resembles wet sand.
- Distribute the Crust: Divide the buttery cookie crumbs evenly among your six serving glasses. Use the back of a small spoon (or the bottom of a shot glass) to press the crumbs down firmly into an even, compact layer at the bottom of each glass. Place the glasses in the refrigerator to firm up while you prepare the filling.
- Whip the Heavy Cream: In a medium mixing bowl, use an electric mixer to beat the cold heavy whipping cream until stiff peaks form. This means when you lift the beaters straight up, the cream stands up firmly without collapsing. Be careful not to over-beat, or it will turn into butter. Set the whipped cream aside in the refrigerator.
- Mix the Cheesecake Base: In a large mixing bowl, beat the softened cream cheese until it is completely smooth and creamy, with no lumps remaining (about 2 minutes). Add 1/2 cup of the Biscoff cookie butter spread, the powdered sugar, and the vanilla extract. Beat the mixture on medium speed until all the ingredients are fully incorporated and the mixture is an even caramel color.
- Fold to Combine: Remove the whipped cream from the fridge. Using a large rubber spatula, gently add about one-third of the whipped cream to the cream cheese mixture and stir it in to lighten the base. Then, add the remaining whipped cream and gently fold it in. To fold, cut straight down through the middle of the mixture with your spatula, scrape along the bottom of the bowl, and lift the mixture up and over. Repeat this gentle motion just until no white streaks of cream remain. Do not stir vigorously, or you will deflate the air you whipped into the cream!
- Fill the Cups: Transfer the creamy filling into a piping bag (or simply use a spoon). Pipe or spoon the filling evenly into the chilled glasses over the prepared cookie crusts, leaving about a half-inch of space at the top of the glass for the final layer. Smooth the tops with the back of a spoon.
- Create the Biscoff Topping: Place the remaining 1/2 cup of Biscoff spread into a microwave-safe bowl. Microwave in 15-second bursts, stirring in between, until the spread is completely melted, warm, and pourable (usually takes about 30 seconds total).
- Pour and Chill: Spoon or pour a thin, even layer of the melted Biscoff spread over the top of the cheesecake filling in each glass. Gently tap the glasses on the counter to help the topping settle into a smooth, flat surface.
- Chill to Set: Transfer the assembled cups to the refrigerator. Allow them to chill for at least 2 hours. This chilling time is mandatory; it allows the melted topping to set back into a soft, fudge-like consistency and gives the cheesecake filling time to firm up.
- Garnish and Serve: Just before serving, garnish each cup with half of a fresh Biscoff cookie pressed into the top, and a light dusting of extra cookie crumbs if desired.
Biscoff “Cheesecake” Cups
Ingredients
Equipment
Method
- Crush the Biscoff cookies in a food processor until they form fine crumbs. Mix thoroughly with the melted butter.
- Divide the crumb mixture evenly among 6 small serving glasses. Press down firmly to create a compact crust. Place in the refrigerator to chill.
- In a bowl, use an electric mixer to beat the cold heavy whipping cream until stiff peaks form. Set aside in the fridge.
- In a separate large bowl, beat the softened cream cheese until completely smooth. Add 1/2 cup of Biscoff spread, powdered sugar, and vanilla extract. Beat until smooth and combined.
- Using a rubber spatula, gently fold the whipped cream into the cream cheese mixture until completely incorporated and no white streaks remain. Do not over-mix.
- Pipe or spoon the cheesecake filling evenly into the glasses over the prepared crusts. Smooth the tops.
- Place the remaining 1/2 cup of Biscoff spread into a microwave-safe bowl. Microwave for 15-30 seconds until melted and pourable.
- Pour a thin layer of the melted Biscoff spread over the cheesecake filling in each glass. Gently tap the glasses on the counter to level the topping.
- Refrigerate the cups for at least 2 hours to allow the filling and topping to set completely.
- Before serving, garnish each cup with half of a Biscoff cookie and a sprinkle of cookie crumbs.
Notes
Pro Tips for the Perfect Texture
While this recipe is incredibly forgiving, paying attention to a few key details will elevate your dessert from good to professional-quality:
- Temperature is Everything: The success of a no-bake cheesecake relies entirely on contrasting temperatures. Your cream cheese must be at room temperature to blend smoothly without lumps. Conversely, your heavy cream must be incredibly cold to whip to stiff peaks. If you try to whip warm cream, it will stay liquid.
- The Folding Technique: The biggest mistake home bakers make with no-bake cheesecakes is using an electric mixer to combine the whipped cream with the cream cheese. This will immediately knock all the air out of the cream, resulting in a dense, heavy, and runny dessert. Always use a spatula and fold by hand.
- Clean Glass Presentation: If you are using a spoon rather than a piping bag to fill your glasses, you might accidentally smear the filling on the inside walls of the cup. Keep a slightly damp paper towel handy to wipe the inside rim of the glass clean before pouring the melted topping on. This ensures distinct, beautiful, sharp layers.
Delicious Variations to Try
The standard Biscoff “Cheesecake” Cup is phenomenal on its own, but the base recipe is quite adaptable. Here are some fun ways to customize your dessert:
- The Chocolate-Biscoff Cup: Biscoff and chocolate are a match made in heaven. Substitute the Biscoff cookie crust for an Oreo cookie crust. Alternatively, you can melt chocolate ganache and use it as the top layer instead of the melted cookie butter. The slightly bitter dark chocolate cuts through the sweetness of the caramel notes beautifully.
- Salted Caramel Crunch: Add a generous pinch of flaky sea salt to the melted Biscoff topping before it sets. The sweet-and-salty combination enhances the deep molasses and brown sugar flavors of the speculoos.
- Mini Cheesecakes: If you do not want to use glasses, you can make these in a standard muffin tin! Line a 12-cup muffin tin with paper liners. Press the crust into the bottom of each liner, pipe the filling on top, and chill until firm. Add the melted topping, let it set, and then peel the paper wrappers off for beautiful, freestanding mini cheesecakes.
Serving Suggestions and Pairings
Because these desserts are quite rich and decadent, they are best served after a lighter meal. The deep spice profile of the Biscoff pairs remarkably well with coffee. Serve these cups alongside a freshly brewed, strong espresso, a dark roast French press coffee, or even an iced latte. If you are serving wine, a slightly chilled Tawny Port or a sweet late-harvest Riesling will complement the caramelized flavors perfectly without overwhelming the palate.
Storage and Make-Ahead Instructions
One of the absolute best features of this recipe is how perfectly it lends itself to being made in advance, making it a stress-free option for entertaining.
Make-Ahead: You can assemble these cups entirely up to 2 days before you plan to serve them. Keep them covered in the refrigerator. Wait to add the final fresh cookie garnish until right before serving, as the cookie will absorb moisture from the fridge and become soft if left for too long.
Storage: If you have leftovers, wrap the tops of the individual glasses tightly with plastic wrap to prevent them from drying out or absorbing savory odors from the refrigerator. They will keep nicely for up to 4 days.
Freezing: Can you freeze these? Absolutely! The high fat content in the cream cheese and heavy cream means they freeze beautifully. Wrap the glasses securely in plastic wrap and freeze for up to 2 months. When you are ready to enjoy them, transfer them to the refrigerator to thaw slowly overnight. They will taste just as fresh as the day you made them.
Frequently Asked Questions (FAQ)
Can I use a different brand of cookies?
If you cannot find Lotus Biscoff cookies, look for anything labeled “Speculoos” or “Speculaas” at your local grocery store (Trader Joe’s makes a fantastic version). If those are unavailable, you can use graham crackers or ginger snaps for the crust, though the flavor profile will change significantly.
My filling is too runny. What happened?
There are usually two culprits for a runny no-bake cheesecake. The first is using low-fat cream cheese or the spreadable kind from a tub, which contains too much water. The second is that the heavy cream was not whipped to sufficiently stiff peaks, or the air was knocked out of the cream while folding it into the cheese mixture.
Is Biscoff spread the same as peanut butter?
Texturally, it is very similar to creamy peanut butter. However, there are no nuts in Biscoff spread. It is made entirely from pulverized cookies, oils, and sugar. It tastes like a sweet, caramelized, cinnamon-spiced cookie.
Can I make this dairy-free or vegan?
Yes, but it requires significant substitutions. Biscoff cookies and Biscoff spread are naturally vegan! To make the filling vegan, you will need to substitute the dairy cream cheese with a high-quality vegan cream cheese block, the heavy whipping cream with a plant-based whipping cream (like a coconut or oat-based heavy cream substitute), and use vegan butter for the crust.
Conclusion
The No-Bake Biscoff “Cheesecake” Cup is a testament to the fact that show-stopping desserts do not have to require hours of labor or complex culinary techniques. By thoughtfully layering contrasting textures—the buttery, crunchy crust, the impossibly light, spiced mousse, and the rich, glossy topping—you create a dessert experience that feels incredibly gourmet. The beloved flavor of speculoos shines brilliantly in every single spoonful. The next time you want to impress your dinner guests, treat your family, or just indulge in a moment of pure, caramelized bliss, grab a jar of cookie butter and whip up these magnificent little cups. They are destined to become a permanent fixture in your dessert repertoire.