The Ultimate Peppermint Fudge Cake
When the winter season approaches and the air turns crisp, our culinary cravings shift toward flavors that offer both comfort and festive cheer. In the pantheon of holiday desserts, the combination of rich, dark chocolate and cool, refreshing peppermint reigns supreme. It is a flavor profile that evokes memories of unwrapping foil-covered candies by the fireplace or sipping a steaming mug of hot cocoa infused with a candy cane. But what if you could capture that quintessential holiday magic and transform it into a show-stopping, bakery-worthy centerpiece? Enter the ultimate Peppermint Fudge Cake.
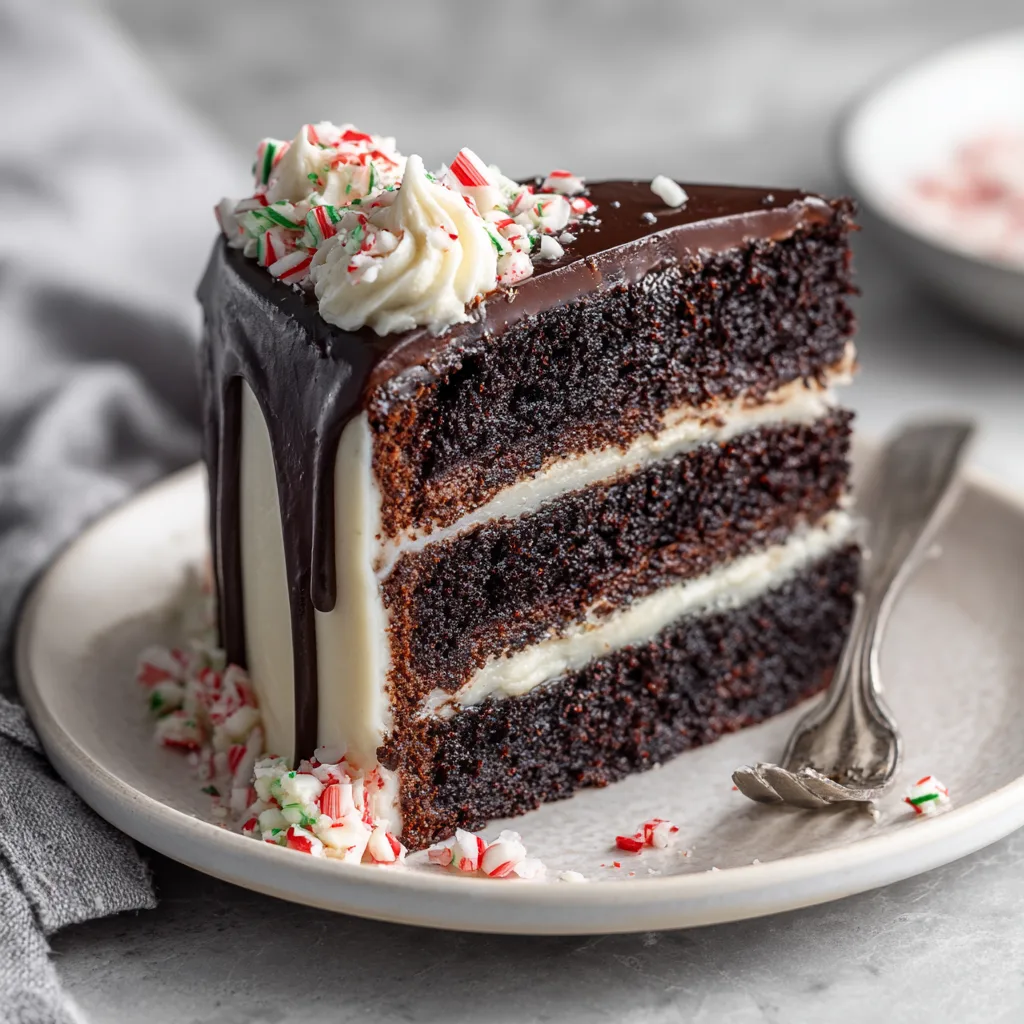
This is not your average, everyday chocolate cake. This magnificent creation features three towering layers of incredibly moist, intensely dark chocolate sponge. Hidden between these tender layers lies a thick, decadent, truffle-like fudge filling that melts on your tongue. The entire cake is then enveloped in a silky, perfectly balanced peppermint buttercream that provides a refreshing counterpoint to the deep cocoa notes. To crown this masterpiece, a glossy dark chocolate ganache drip cascades over the edges, providing a beautiful canvas for a festive garnish of crushed candy canes and peppermint swirls. It is a dessert designed to elicit gasps of admiration and sighs of culinary satisfaction from your holiday guests.
The Anatomy of a Bakery-Style Masterpiece
Creating a cake that looks and tastes like it came from a high-end patisserie requires an understanding of how different textures and flavors interact. This Peppermint Fudge Cake is a masterclass in structural and flavor balance. Let us dissect the components that make this cake truly extraordinary:
1. The Dark Chocolate Sponge Layers
The foundation of this dessert must be robust enough to support heavy fudge, yet tender enough to offer a delicate crumb. We achieve this by utilizing an oil-based cake batter enhanced with buttermilk and hot coffee. The oil ensures the cake remains moist for days, unlike butter-based cakes which can dry out in the refrigerator. The hot coffee doesn’t make the cake taste like espresso; rather, it “blooms” the cocoa powder, intensifying the chocolate flavor and deepening its dark, rich color.
2. The Decadent Fudge Filling
This is the element that elevates the recipe from a standard layer cake to a “Fudge Cake.” Instead of a standard buttercream or thin ganache between the layers, we use a structured, dense fudge filling. Made with a blend of sweetened condensed milk and high-quality semi-sweet chocolate, it mimics the texture of a soft truffle. It provides a luxurious, incredibly rich mouthfeel that contrasts beautifully with the spongy cake.
3. The Silky Peppermint Buttercream
Peppermint frosting can easily veer into “toothpaste” territory if not handled with care. The key is balance. By using a Swiss meringue buttercream base or a highly aerated American buttercream made with half butter and half shortening, we create a fluffy, not-too-sweet frosting. A precise dose of pure peppermint extract (never mint extract, which tastes like spearmint) gives it a crisp, refreshing bite that cleanses the palate after the heavy chocolate.
4. The Dramatic Ganache Drip
A signature of modern bakery cakes is the elegant drip. A simple combination of chocolate and heavy cream creates a ganache that, when poured at the exact right temperature, yields beautiful, gravity-defying drips that signal absolute indulgence.
Ingredient Deep-Dive: What You Need for Success
Baking is a science, and the quality and type of ingredients you select will directly impact your final product. Here is what you need to gather for this spectacular Peppermint Fudge Cake:
- Dutch-Processed Cocoa Powder: This is crucial. Dutch-processed cocoa has been treated with an alkalizing agent to reduce its natural acidity. It produces a darker color and a smoother, more mellow chocolate flavor than standard unsweetened cocoa powder.
- Hot Coffee (or Hot Water): The heat from the liquid dissolves the cocoa powder, releasing flavor compounds that would otherwise remain locked away. If you are sensitive to caffeine, decaf coffee or plain boiling water will work.
- Buttermilk: The acidity in buttermilk tenderizes the gluten in the flour, resulting in a remarkably soft crumb. If you don’t have buttermilk, you can make a substitute by adding 1 tablespoon of white vinegar to a cup of whole milk and letting it sit for 5 minutes.
- Vegetable Oil or Canola Oil: Oil coats flour proteins better than butter, preventing gluten formation and ensuring a superbly moist cake that stays soft even when chilled.
- Sweetened Condensed Milk: The secret ingredient for the fast, foolproof fudge filling. It provides sweetness and an incredibly smooth, viscous texture when melted with chocolate.
- Pure Peppermint Extract: Always check the label. You want “peppermint,” not “mint” (which is often a blend of spearmint and peppermint and will make your cake taste like chewing gum).
- High-Quality Chocolate Chips or Bars: For the filling and the drip, avoid cheap chocolate chips that contain stabilizers, as they will not melt smoothly. Opt for premium baking chips or chopped baking bars (around 60% cacao).
- Peppermint Candies: For the final, festive garnish. Mini candy canes or round starlight mints work beautifully.
Step-by-Step Instructions: Building Your Cake
Tackling a multi-component layer cake can feel intimidating, but by breaking the process down into manageable steps, even a novice baker can achieve stunning results. Note: The cake layers and the fudge filling can be made a day in advance!
Phase 1: Baking the Chocolate Cake
- Prep Your Pans: Preheat your oven to 350°F (175°C). Grease three 8-inch round cake pans and line the bottoms with parchment paper circles. This guarantees your cakes will release flawlessly.
- Whisk the Dry Ingredients: In a large mixing bowl, whisk together the flour, sugar, Dutch-processed cocoa powder, baking soda, baking powder, and salt. Whisking aerates the mixture and breaks up any cocoa lumps.
- Combine the Wet Ingredients: In a separate bowl, whisk the eggs, buttermilk, oil, and vanilla extract until smooth.
- Merge and Bloom: Pour the wet ingredients into the dry ingredients and mix until just combined (do not overmix). Finally, carefully pour in the hot coffee. Stir gently. The batter will be very thin and liquidy—this is exactly how it should look!
- Bake and Cool: Divide the batter evenly among the three prepared pans. Bake for 30-35 minutes, or until a toothpick inserted into the center comes out with just a few moist crumbs attached. Let the cakes cool in the pans for 10 minutes before turning them out onto wire racks to cool completely.
Phase 2: Creating the Fudge Filling
- Melt and Combine: In a medium saucepan over low heat, combine the sweetened condensed milk and the semi-sweet chocolate. Stir continuously until the chocolate is completely melted and the mixture is smooth and glossy. Remove from heat and stir in a splash of vanilla extract.
- Cool to the Right Consistency: Transfer the fudge to a bowl. It will be quite runny when hot. You must let it cool at room temperature until it reaches a spreadable, frosting-like consistency. Do not put it in the fridge, or it will become too hard to spread.
Phase 3: Whipping the Peppermint Buttercream
- Beat the Butter: In the bowl of a stand mixer fitted with a paddle attachment, beat the softened, room-temperature butter on medium-high speed for about 5 minutes until it is very pale and fluffy.
- Add the Sugar: Gradually add the powdered sugar, about a cup at a time, mixing on low speed until incorporated before adding the next cup.
- Flavor and Whip: Add the heavy cream, pure peppermint extract, and a tiny pinch of salt. Increase the mixer speed to medium-high and whip for another 3-5 minutes until the frosting is incredibly light, airy, and silky smooth.
Phase 4: Assembly and Decoration
- Level the Cakes: Use a serrated knife or a cake leveler to trim the domes off the tops of your cooled cake layers so they are perfectly flat.
- Create a Buttercream Dam: Place the first cake layer on your serving platter or cake stand. Place a cup of the peppermint buttercream into a piping bag. Pipe a thick ring (a “dam”) of buttercream around the very outer top edge of the cake layer. This prevents the soft fudge filling from squishing out the sides.
- Add the Fudge: Spoon half of the cooled, thickened fudge filling into the center of the buttercream dam and spread it into an even layer. Place the second cake layer on top and repeat the process (buttercream dam, remaining fudge).
- Crumb Coat: Top with the final cake layer (bottom-side up for a perfectly flat top). Apply a very thin layer of peppermint buttercream over the entire outside of the cake to lock in the dark chocolate crumbs. Chill the cake in the refrigerator for 20 minutes to set this crumb coat.
- Final Frost: Apply a thick, smooth layer of peppermint buttercream over the chilled crumb coat. Use a bench scraper to achieve smooth sides. Return the cake to the fridge to chill thoroughly while you prepare the drip.
- The Chocolate Drip: Heat 1/2 cup of heavy cream until simmering, then pour it over 1/2 cup of chocolate chips. Let it sit for 2 minutes, then stir until a smooth ganache forms. Let it cool until it is slightly thickened but still pourable. Using a spoon or a squeeze bottle, carefully add drips around the top edge of your chilled cake, then fill in the top surface.
- Garnish: Pipe decorative swirls of leftover buttercream around the top border. Adorn the swirls with peppermint candies, mini candy canes, and a sprinkle of crushed peppermints.
Pro Tips for a Flawless Bakery Cake
To ensure your Peppermint Fudge Cake turns out perfectly, keep these professional tips in your back pocket:
- Temperature is Everything: Your cake layers must be 100% cool before you even attempt to assemble them. If they are even slightly warm, they will melt the fudge and the buttercream, resulting in a sliding, collapsing cake disaster.
- Weigh Your Batter: For perfectly even cake layers, use a digital kitchen scale to weigh your pans as you divide the batter.
- The Cold Cake Advantage: Decorating a chilled cake is infinitely easier than a room-temperature one. The buttercream sets up firm, allowing you to achieve sharp edges and apply a flawless ganache drip without melting the frosting underneath.
Serving Suggestions and Menu Pairings
A cake this magnificent deserves an event. It is the quintessential dessert for a Christmas Eve dinner, a holiday office party, or a winter birthday celebration. Because the cake is incredibly rich, slice it relatively thin—it will easily serve 14 to 16 people.
Serve each slice alongside a stark contrast to cut the richness. A strong cup of dark roast coffee or a shot of espresso is perfection. If serving to children (or children at heart), a glass of ice-cold whole milk is the classic accompaniment. For an adults-only gathering, pair a slice with a creamy Baileys Irish Cream over ice or a peppermint-infused White Russian.
Storage and Freezing Instructions
Leftover cake is a joyous thing, provided it is stored correctly to maintain its moisture and texture.
Refrigerator Storage: Because of the dairy in the buttercream and ganache, this cake should be stored in the refrigerator. To keep the cut edges from drying out, press a piece of plastic wrap directly against the exposed cake. You can also store slices in an airtight container for up to 5 days. Crucial Note: Always allow the cake to sit at room temperature for 1-2 hours before serving. Buttercream hardens in the fridge, and it needs to soften to regain its silky texture!
Freezing the Cake: You can freeze the baked, unfrosted cake layers wrapped tightly in plastic wrap for up to 2 months. You can also freeze the fully assembled and decorated cake! Place the whole cake in the freezer for an hour until the frosting is rock hard. Then, wrap the entire cake tightly in two layers of plastic wrap and one layer of foil. Thaw overnight in the refrigerator before unwrapping and bringing to room temperature.
Frequently Asked Questions (FAQs)
Can I make this into cupcakes instead?
Yes! This batter makes excellent cupcakes. Line two 12-hole muffin tins with paper liners and fill each about 2/3 full. Bake at 350°F (175°C) for 18-22 minutes. You can core out the center of the cooled cupcakes and pipe the fudge filling inside, then frost the top with the peppermint buttercream.
My fudge filling is too hard/too soft. How do I fix it?
The consistency of the fudge filling relies heavily on temperature. If it is too runny to spread without spilling over the cake, pop it in the fridge for 10-minute intervals, stirring in between, until it thickens. If you left it in the fridge too long and it became a solid brick, microwave it in 10-second bursts, stirring vigorously, until it reaches a spreadable state.
Can I use white chocolate for the drip?
Absolutely. A white chocolate drip looks stunning and snowy! However, white chocolate requires less heavy cream to reach a drip consistency. Use a ratio of 3 parts white chocolate to 1 part heavy cream for your white ganache drip.
Creating this Peppermint Fudge Cake is a labor of love that is guaranteed to pay off in spades. With its contrasting textures, deep chocolate intensity, and refreshing peppermint finish, it is a culinary masterpiece that captures the very essence of the holiday season. Happy baking!
Bakery-Style Peppermint Fudge Cake
Ingredients
Equipment
Method
- Preheat oven to 350°F (175°C). Grease three 8-inch cake pans and line the bottoms with parchment paper.
- In a large bowl, whisk together flour, sugar, cocoa powder, baking soda, baking powder, and salt.
- In a separate bowl, whisk the eggs, buttermilk, oil, and vanilla. Pour into the dry ingredients and mix until just combined.
- Carefully stir in the hot coffee until the batter is smooth. It will be thin. Divide evenly among the three pans.
- Bake for 30-35 minutes until a toothpick comes out mostly clean. Cool in pans for 10 minutes, then transfer to a wire rack to cool completely.
- For the fudge filling: Melt the chocolate chips and sweetened condensed milk in a saucepan over low heat until smooth. Stir in vanilla. Let cool at room temperature until spreadable.
- For the buttercream: Beat the softened butter for 5 minutes until pale. Gradually add powdered sugar, mixing on low. Add heavy cream, peppermint extract, and salt. Whip on medium-high until fluffy.
- To assemble: Level the cakes. Place one layer on a plate. Pipe a ring (dam) of buttercream around the outer edge. Spread half the cooled fudge inside the ring. Top with the second cake and repeat. Top with the final cake layer.
- Frost the entire cake with a thin crumb coat of buttercream. Chill for 20 minutes. Apply the final smooth layer of buttercream and chill again.
- For the drip: Heat 1/2 cup heavy cream until simmering, pour over 1/2 cup chocolate chips. Let sit 2 minutes, then stir until smooth. Let cool slightly, then drip around the edges of the chilled cake.
- Garnish the top with remaining buttercream swirls, peppermint candies, and mini candy canes. Serve at room temperature.