Vietnamese Coffee Marble Cookies Recipe
There are few flavor combinations as universally beloved and deeply comforting as the bold, robust bitterness of dark coffee paired with the rich, velvety sweetness of condensed milk. If you have ever had the pleasure of sipping a traditional Vietnamese iced coffee—known as Cà Phê Sữa Đá—you know exactly how magical this pairing can be. Today, we are taking those iconic, culturally celebrated flavors and transforming them into a spectacular baked treat: Vietnamese Coffee Marble Cookies.
These cookies are an absolute showstopper. Visually, they are stunning, featuring dramatic swirls of dark, espresso-infused dough intertwined with pale, sweet, milk-infused dough. Each cookie looks like a miniature piece of edible art, marbled to perfection. But the real magic happens when you take a bite. The outer edges are perfectly crisp and rolled in a subtle crunch of granulated sugar, while the centers remain thick, chewy, and tender. The dark dough delivers a punch of intense coffee flavor, which is immediately balanced and smoothed out by the sweet, vanilla-forward blonde dough. It is a harmonious dance of bitter and sweet, chewy and crisp, all wrapped up in one magnificent cookie.
Whether you are a seasoned baker looking to impress your friends at a cookie exchange, or a novice wanting to try your hand at a fun, flavor-packed weekend project, this comprehensive guide will walk you through everything you need to know. We will cover the science of the swirl, the importance of ingredient selection, and the cultural inspiration behind this phenomenal dessert. Get ready to fill your kitchen with the irresistible aroma of freshly brewed coffee and warm butter!
The Inspiration: Cà Phê Sữa Đá
Before we dive into the mixing bowls, it is essential to understand the inspiration behind this recipe. Vietnamese coffee, or Cà Phê Sữa Đá, is a traditional beverage made by brewing dark-roast coffee—typically Robusta beans, which are known for their high caffeine content and strong, slightly bitter, earthy flavor profile—through a small metal drip filter known as a phin. The intensely strong coffee slowly drips directly into a glass containing a generous pour of sweetened condensed milk.
Once the brewing is complete, the coffee and condensed milk are stirred together, creating a thick, creamy, caramel-colored beverage that is then poured over a tall glass of ice. The result is a drink that is refreshing, intensely caffeinated, and delightfully sweet. The Robusta beans cut right through the heavy syrup of the condensed milk, ensuring the drink is never cloying.
To translate this into a cookie, we cannot simply pour coffee and milk into a standard dough. We need to create two distinct doughs that represent the two components of the drink before they are fully mixed. The dark dough uses instant espresso powder to mimic the strong phin-dripped coffee, while the light dough utilizes actual sweetened condensed milk to capture that unique dairy sweetness and chewy texture. When swirled together, you get the visual representation of the drink mixing, alongside the perfectly balanced flavor profile.
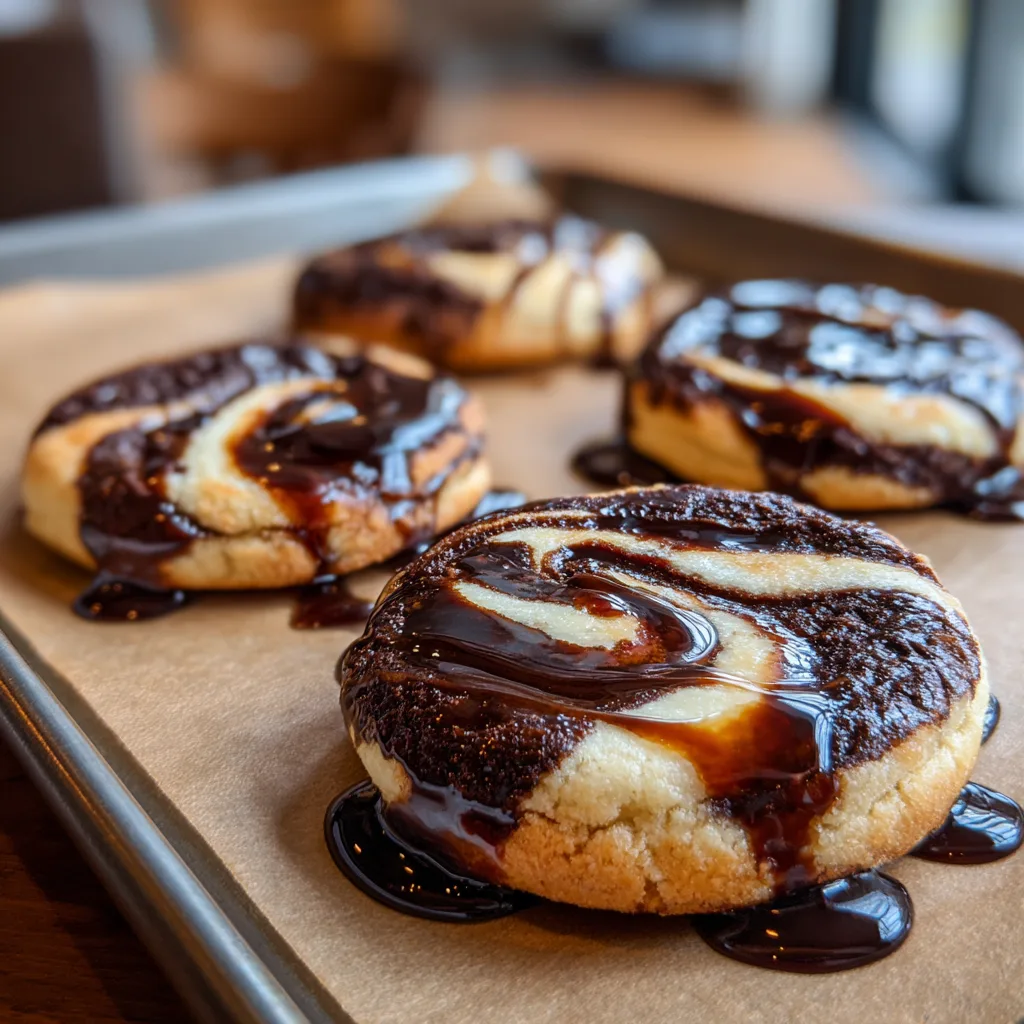
Ingredients for Vietnamese Coffee Marble Cookies
To achieve the perfect texture and flavor, gather the following ingredients. We highly recommend using high-quality instant espresso powder for the best coffee flavor.
For the Base Cookie Dough:
- – 3 cups all-purpose flour
- – 1 teaspoon baking soda
- – 1/2 teaspoon baking powder
- – 1 teaspoon kosher salt
- – 1 cup unsalted butter (2 sticks), softened to room temperature
- – 1 cup granulated sugar
- – 3/4 cup light brown sugar, packed
- – 2 large eggs, room temperature
- – 2 teaspoons pure vanilla extract
For the Sweetened Condensed Milk Dough (The “Sữa” Half):
- – 3 tablespoons sweetened condensed milk
- – 2 tablespoons extra all-purpose flour
For the Espresso Dough (The “Cà Phê” Half):
- – 3 tablespoons hot water
- – 3 tablespoons instant espresso powder (or high-quality instant coffee)
- – 1 tablespoon unsweetened cocoa powder (for color enhancement)
For Rolling:
- – 1/3 cup granulated sugar
Step-by-Step Instructions
Follow these precise steps to ensure your cookies have the perfect swirl and the ideal chewy texture.
- Prepare your equipment: Preheat your oven to 350°F (175°C). Line two large baking sheets with parchment paper or silicone baking mats. Set aside a small bowl with the 1/3 cup of granulated sugar for rolling.
- Mix the dry base ingredients: In a medium mixing bowl, whisk together the 3 cups of all-purpose flour, baking soda, baking powder, and kosher salt. Ensure the leavening agents are evenly distributed throughout the flour. Set this bowl aside.
- Cream the butter and sugars: In the bowl of a stand mixer fitted with the paddle attachment, or in a large bowl using a hand mixer, beat the softened unsalted butter, 1 cup of granulated sugar, and 3/4 cup of packed brown sugar on medium-high speed. Beat for about 3 to 4 minutes until the mixture is visibly lighter in color, fluffy, and smooth. Scrape down the sides of the bowl with a rubber spatula as needed.
- Add eggs and vanilla: Reduce the mixer speed to medium-low. Add the eggs one at a time, allowing the first egg to fully incorporate before adding the second. Pour in the vanilla extract and mix until just combined.
- Incorporate the dry ingredients: With the mixer on its lowest speed, gradually add the dry flour mixture to the wet ingredients in three additions. Mix only until the flour streaks just disappear. Do not overmix, or your cookies will become tough.
- Divide the dough: Remove the dough from the bowl and divide it as evenly as possible into two separate bowls. You can use a kitchen scale for precision, but eyeballing it is perfectly fine.
- Flavor the milk dough: To the first bowl of dough, add the 3 tablespoons of sweetened condensed milk and the extra 2 tablespoons of all-purpose flour (the extra flour helps balance the moisture of the liquid milk). Use a rubber spatula to fold the milk and flour into the dough until completely smooth and cohesive.
- Flavor the espresso dough: In a very small dish, stir together the 3 tablespoons of hot water, 3 tablespoons of instant espresso powder, and 1 tablespoon of cocoa powder until it forms a thick, dark paste. Add this espresso paste to the second bowl of dough. Mix thoroughly until the dough is a uniform dark brown color with no streaks of plain dough remaining.
- Chill the doughs: Cover both bowls tightly with plastic wrap and place them in the refrigerator to chill for at least 30 minutes. Chilling makes the dough easier to handle, enhances the flavors, and prevents the cookies from spreading too thinly in the oven.
- Create the marble swirl: Once chilled, take about 1 tablespoon of the light dough and 1 tablespoon of the dark dough. Gently press them together in your hands, then gently roll them into a single ball (about 2 tablespoons in total volume per cookie). The goal is to see distinct patches and swirls of dark and light. Do not over-roll, or the colors will muddy into a uniform light brown.
- Roll in sugar: Toss the marbled dough ball into the small bowl of granulated sugar, rolling it around until the outside is completely coated. This will give the cookies a beautiful crinkly top and a slightly crisp exterior.
- Place on baking sheet: Transfer the sugar-coated dough balls to the prepared baking sheets, leaving about 2 to 3 inches of space between each cookie to allow for spreading.
- Bake: Bake in the preheated oven for 11 to 13 minutes. The edges should look set and slightly golden, but the centers should still look a little soft and underbaked. They will continue to cook on the baking sheet as they cool.
- Cool and serve: Allow the cookies to cool on the baking sheet for 5 minutes before using a spatula to transfer them to a wire cooling rack to cool completely. Enjoy with a cold glass of milk or, appropriately, a cup of coffee!
Vietnamese Coffee Marble Cookies
Ingredients
Equipment
Method
- Preheat oven to 350°F (175°C) and line two large baking sheets with parchment paper.
- In a medium bowl, whisk together 3 cups flour, baking soda, baking powder, and salt.
- In a large bowl, cream the softened butter, 1 cup granulated sugar, and brown sugar until light and fluffy (3-4 minutes).
- Mix in the eggs one at a time, followed by the vanilla extract.
- Gradually mix in the dry ingredients on low speed until just combined. Do not overmix.
- Divide the dough equally into two bowls.
- To the first bowl, fold in the sweetened condensed milk and 2 tablespoons of extra flour until smooth.
- In a small dish, mix hot water, espresso powder, and cocoa powder into a paste. Fold this paste into the second bowl of dough until completely dark brown.
- Cover both bowls and chill in the refrigerator for at least 30 minutes.
- Take 1 tablespoon of milk dough and 1 tablespoon of espresso dough, press them together, and gently roll into a ball to create a marbled effect.
- Roll the marbled dough balls in the remaining 1/3 cup of granulated sugar and place on baking sheets 2 inches apart.
- Bake for 11-13 minutes until edges are set but centers are still soft. Cool on the pan for 5 minutes before moving to a wire rack.
Notes
The Science of Marbling and Texture
Creating the perfect marble effect is an exercise in restraint. The temptation is always to roll the dough aggressively to make it perfectly smooth, but doing so destroys the beautiful contrast between the two doughs. By simply pressing the two halves together and giving them a gentle, quick roll, you allow the different colored doughs to bake side-by-side.
Furthermore, the texture of these cookies relies heavily on the specific ingredients we use. The addition of brown sugar in the base dough introduces molasses, which adds moisture and guarantees a chewy center. The sweetened condensed milk in the blonde dough adds milk solids and a unique caramelized sugar note that tenderizes the crumb, making the blonde sections slightly softer and fudgier than a standard cookie. The espresso paste added to the dark dough actually acts as an astringent, slightly firming up that portion of the dough. This contrast in textures—a slightly firmer espresso bite yielding to a soft, milky center—mimics the complex mouthfeel of a high-quality dessert.
Pro-Tips for the Best Results
To ensure your Vietnamese Coffee Marble Cookies turn out flawlessly every single time, keep these professional baking tips in mind:
- Don’t skip the chilling step: Because we are introducing extra liquids (condensed milk and espresso paste) into our divided doughs, the dough becomes quite soft. Chilling solidifies the butter and allows the flour to hydrate fully. If you skip chilling, your cookies will spread into flat, thin puddles during baking.
- Use instant espresso, not ground coffee: Regular coffee grounds will not dissolve in the dough, leaving you with gritty, unpleasant pieces in your cookies. Instant espresso powder dissolves completely, providing an intense, smooth coffee flavor without the grit.
- The “Pan Banging” technique: If you love cookies with crinkly edges and a dense center, try banging the baking sheet on the oven rack halfway through the baking time. This forces the puffed-up air out of the cookies, creating delicious textural ripples.
- Perfecting the aesthetic: If you want your cookies to look perfectly round like they came from a high-end bakery, take a large round biscuit cutter or a wide mug and swirl it around the freshly baked cookies the very second they come out of the oven. This pushes the soft edges inward, creating a perfect circle.
Variations and Substitutions
While this recipe is phenomenal as written, baking is all about creativity. Here are a few ways you can tweak the recipe to suit your personal preferences or what you have in your pantry:
- Chocolate Chip Coffee Cookies: Fold half a cup of mini semi-sweet chocolate chips into the dark espresso dough before chilling. The chocolate complements the coffee beautifully, giving it a mocha vibe.
- Dairy-Free Option: Substitute the butter with a high-quality vegan butter stick. For the sweetened condensed milk, many grocery stores now sell sweetened condensed coconut milk or oat milk, which work perfectly as a 1:1 substitution.
- Nutty Addition: Finely chopped toasted hazelnuts or pecans add a wonderful crunch that pairs excellently with the coffee and caramel notes. Fold 1/4 cup of nuts into the blonde dough.
- Salted Caramel Drizzle: To take these cookies over the top, drizzle them with a homemade or store-bought salted caramel sauce once they have cooled completely. The salt elevates the bitterness of the coffee.
Serving Suggestions and Pairings
These Vietnamese Coffee Marble Cookies are incredibly versatile when it comes to serving. Naturally, they are the ultimate companion to your morning brew or an afternoon tea break. The slightly bitter notes of the espresso dough make them an excellent candidate for dipping into hot beverages.
If you are serving these as a plated dessert for a dinner party, consider pairing them with a scoop of premium vanilla bean or cinnamon ice cream. You can even use two of these cookies to create a massive, indulgent ice cream sandwich! For an authentic homage to their namesake, serve them alongside a freshly made glass of Cà Phê Sữa Đá. The mirroring of flavors between the drink and the cookie will blow your guests away.
Storage and Freezing Instructions
One of the best things about drop cookies is how wonderfully they store and freeze, allowing you to have a freshly baked treat at a moment’s notice.
Room Temperature Storage: Once the cookies have cooled completely to room temperature, place them in an airtight container. They will stay fresh, soft, and chewy for up to 5 days. You can place a small piece of plain white bread in the container with them; the cookies will absorb the moisture from the bread, keeping them softer for longer.
Freezing Baked Cookies: Baked cookies can be frozen for up to 3 months. Let them cool entirely, then stack them in a freezer-safe zip-top bag with small squares of parchment paper between the cookies so they don’t stick together. Thaw at room temperature for an hour before eating.
Freezing Unbaked Cookie Dough: This is our preferred method! Prepare the dough, marble it into balls, and roll them in sugar as instructed. Instead of baking, place the dough balls on a baking sheet and freeze them solid (about 1 hour). Once frozen hard, transfer the balls to a freezer bag. You can bake them straight from frozen, simply adding 1 to 2 extra minutes to the baking time.
Frequently Asked Questions (FAQ)
Can I use regular instant coffee instead of espresso powder?
Yes, you can. However, standard instant coffee is generally milder than instant espresso. If you only have instant coffee, you may want to increase the amount by an extra tablespoon to ensure the coffee flavor is strong enough to stand out against the sweet milk dough.
Why did my cookies spread so much?
The most common culprit for flat cookies is butter that was too warm when mixing, or failing to chill the dough for the full 30 minutes. Also, ensure you are measuring your flour correctly (spooning it into the measuring cup and leveling it off, rather than scooping directly from the bag, which packs the flour too tightly).
Can I make the dough ahead of time?
Absolutely! You can leave the divided doughs tightly wrapped in the refrigerator for up to 3 days before you plan to roll and bake them. The flavors actually deepen and develop wonderfully when the dough rests overnight.
Conclusion
Baking is often seen as a precise, rigid science, but recipes like these Vietnamese Coffee Marble Cookies prove that it is also a fantastic outlet for culinary art and cultural celebration. By taking the iconic, beloved flavors of Cà Phê Sữa Đá and translating them into a chewy, buttery, visually striking cookie, you are creating an experience that is both familiar and excitingly new.
The contrast between the dark, robust espresso and the pale, sweet milk dough creates a perfect harmony that will have you coming back for a second (or third) cookie. We hope this comprehensive guide has equipped you with all the knowledge, tips, and confidence you need to master this recipe in your own kitchen. Tie your apron, preheat your oven, and get ready to bake your new favorite treat. Happy baking!