The Magic of Homemade Pop Rocks: A Nostalgic Fizzy Candy Recipe
There is something undeniably magical about popping candy. For many of us, it is the ultimate taste of childhood nostalgia—tearing open a small foil packet, pouring the brightly colored shards onto our tongues, and waiting for that unmistakable crackle, pop, and fizz. It is a sensory experience unlike any other in the candy aisle. But what if you could recreate that exciting, fizzy sensation right in your own kitchen? Enter the world of Homemade Pop Rocks. This recipe transforms ordinary pantry staples into a vibrant, exciting, and wonderfully fizzy treat that will thrill kids and adults alike.
While commercial popping candy is made by trapping pressurized carbon dioxide gas inside hard candy—which is released as the candy melts on your tongue—we can achieve a remarkably similar and equally fun effect at home using simple kitchen chemistry. By combining citric acid and baking soda within a hard candy matrix, and coating the candies in a sour-fizz sugar blend, we create an acid-base reaction that activates the moment it hits the moisture in your mouth. The result is a delightful tingling, bubbling, and popping sensation that makes eating this candy an interactive adventure.
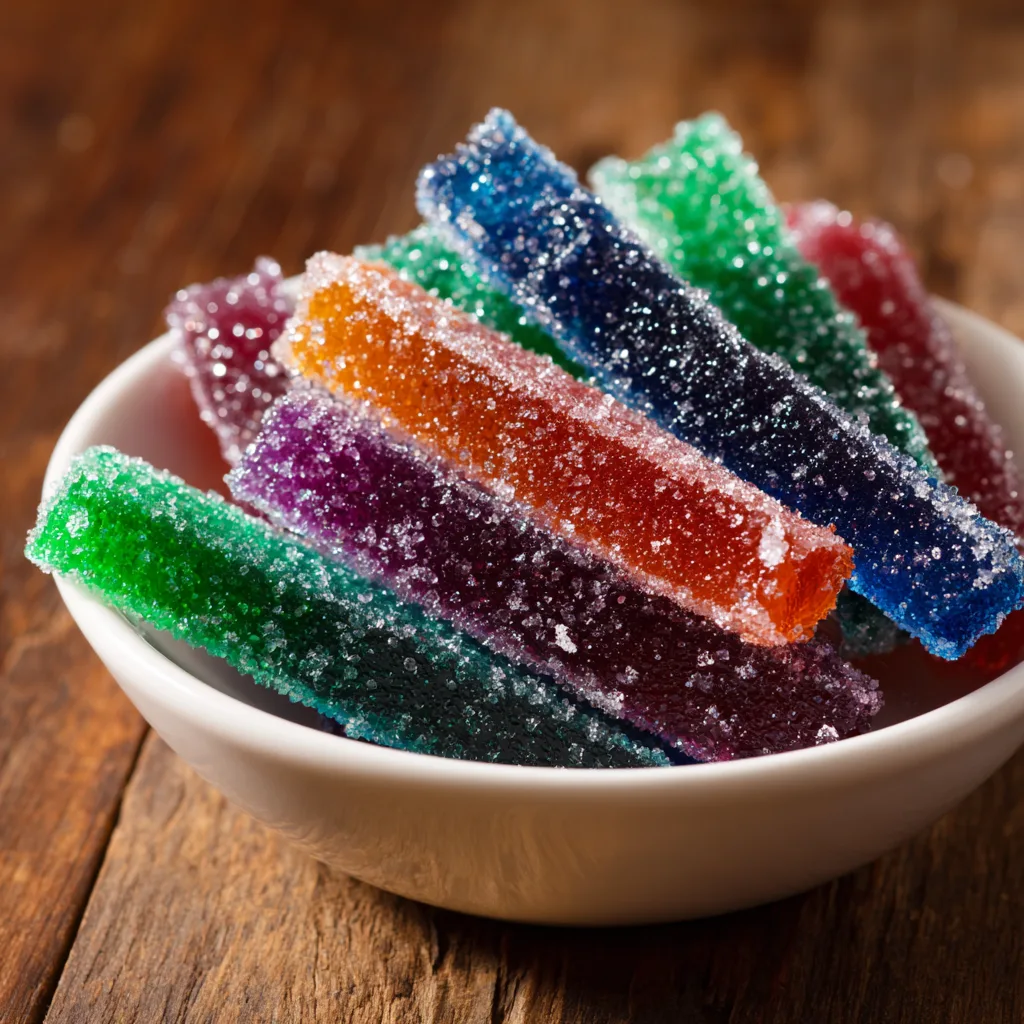
Beyond the fun factor, making your own candy at home allows you completely customize the experience. You have total control over the flavors, the intensity of the colors, and the level of sourness. You can create neat, colorful sticks as shown, or break it into classic, jagged shards. It is a fantastic weekend project, an engaging edible science experiment for children, and a unique, impressive treat to share at parties or give as edible gifts.
The Science Behind the Fizz: How It Works
To truly appreciate this recipe, it helps to understand the delightful chemistry happening behind the scenes. In a factory setting, sugar syrup is heated and mixed with carbon dioxide gas at around 600 pounds per square inch of pressure. As the candy cools and hardens, tiny bubbles of the pressurized gas are trapped inside. When you eat it, your saliva dissolves the sugar, bursting the bubbles and releasing the gas with a “pop.”
Since we don’t have high-pressure gas chambers in our home kitchens, we rely on a different method: an acid-base reaction. Baking soda (sodium bicarbonate) is a base, and citric acid is, naturally, an acid. When these two ingredients are dry, nothing happens. They sit peacefully next to each other. However, the moment they are introduced to moisture (like the water in your saliva), they react, creating carbon dioxide gas. By folding a tiny bit of baking soda into our hot candy syrup at the last moment, and then heavily coating our finished candies in a mixture of sugar and citric acid, we set the stage for a fizzy explosion. As the candy melts in your mouth, the acid and base mix with your saliva, producing thousands of tiny carbon dioxide bubbles that tickle and fizz on your tongue.
Essential Ingredients for Fizzy Candy
Candy making is a precise art, and gathering the right ingredients is the first step to success. Here is what you need to create your own vibrant, popping treats:
- Granulated Sugar: This is the foundation of our hard candy. It provides the structure and sweetness.
- Light Corn Syrup: This is a crucial ingredient in candy making. Corn syrup acts as an “interfering agent,” which prevents the granulated sugar from crystallizing as it boils and cools. Without it, your candy could turn into a gritty, grainy mess instead of a smooth, glassy treat.
- Water: Used to dissolve the sugar and corn syrup so they can boil together evenly. Most of the water will evaporate during the cooking process.
- Baking Soda: The base component of our fizzy reaction. A small amount is added to the hot syrup to create a slightly porous texture in the candy.
- Citric Acid: The acid component. You can find this in the canning section of most supermarkets or online. It provides a tart, sour punch and reacts with the baking soda to create the fizz. We use it primarily in the candy coating.
- Candy Flavoring Oils/Extracts: Because the candy reaches very high temperatures, it is best to use concentrated candy flavoring oils (like LorAnn oils) rather than standard grocery store extracts (which are alcohol-based and can evaporate or burn off quickly). Strawberry, blue raspberry, grape, and green apple are fantastic choices.
- Liquid or Gel Food Coloring: To give your candies those vibrant, eye-catching jewel tones.
Step-by-Step Instructions: Mastering the Hard Crack Stage
Making hard candy requires focus and safety precautions, as boiling sugar is incredibly hot. A reliable candy thermometer is absolutely essential for this recipe. Do not attempt to guess the temperature!
- Prepare Your Molds and Coating: Before you begin cooking, prepare your workspace. Lightly spray a silicone candy mold (rectangular or stick shapes work perfectly) or a baking sheet with non-stick cooking spray. In a small, shallow bowl, mix together 1/2 cup of granulated sugar and 1 tablespoon of citric acid. This is your fizzy coating. Set it aside.
- Mix the Syrup Base: In a medium-sized, heavy-bottomed saucepan, combine the granulated sugar, light corn syrup, and water. Stir gently just until the sugar is moistened. Attach your candy thermometer to the side of the pan, ensuring the bulb is submerged in the mixture but not touching the very bottom of the pan.
- Boil to Hard Crack Stage: Place the saucepan over medium-high heat. Do not stir the mixture once it begins to boil, as stirring can encourage unwanted crystallization. Allow the mixture to boil steadily until the candy thermometer reaches 300°F (149°C). This is known as the “hard crack” stage, where the sugar syrup contains almost no water and will set into a hard, brittle candy.
- Add Color and Flavor: Once the temperature hits 300°F, immediately remove the saucepan from the heat. Working very quickly and carefully, stir in your chosen food coloring and 1/2 to 1 teaspoon of candy flavoring oil. Caution: The mixture may bubble up slightly when you add the liquid.
- The Secret Fizz Step: Add 1/4 teaspoon of baking soda and whisk quickly but gently. The candy will foam up slightly. This creates microscopic bubbles within the candy structure.
- Pour and Set: Carefully pour the hot, foaming candy mixture into your prepared silicone molds. If using a baking sheet, pour it out into a thin layer. Allow the candy to sit undisturbed at room temperature until completely cool and hardened. This usually takes about 1 to 2 hours.
- Coat in the Fizz: Once the candy is completely cool and rock solid, pop the sticks out of the mold. If you used a baking sheet, use the handle of a butter knife to crack the sheet into bite-sized shards. Take each piece of candy and toss it generously in your prepared sugar-citric acid coating mixture. The slight tackiness of the freshly exposed candy will help the coating adhere.
- Enjoy the Pop!: Your Homemade Pop Rocks are ready. Pop a piece in your mouth and enjoy the sour, sweet, fizzy sensation!
Homemade Pop Rocks
Ingredients
Equipment
Method
- Lightly coat a silicone candy mold or a rimmed baking sheet with non-stick cooking spray. In a small bowl, mix together the 1/2 cup sugar and 1 tablespoon citric acid for the coating and set aside.
- In a heavy-bottomed saucepan, combine the 2 cups of sugar, corn syrup, and water. Stir gently to moisten the sugar. Attach a candy thermometer to the side of the pan.
- Bring the mixture to a boil over medium-high heat. Do not stir once it starts boiling. Continue to boil until the thermometer reaches 300°F (149°C), the hard crack stage.
- Immediately remove the pan from the heat. Working quickly, carefully whisk in the food coloring and candy flavoring oil.
- Add the baking soda and whisk quickly but gently. The mixture will foam slightly.
- Carefully pour the hot candy mixture into your prepared silicone molds or spread it thinly onto the prepared baking sheet.
- Allow the candy to sit at room temperature until completely cool and hardened, about 1 to 2 hours.
- Remove the candy from the molds (or crack the sheet into pieces). Toss the candy pieces generously in the prepared sugar-citric acid mixture until coated.
- Store in an airtight container at room temperature away from humidity.
Notes
Pro Tips for Perfect Candy Making
If you are new to candy making, the process might seem intimidating, but following these pro tips will ensure your success on the first try.
Calibrate Your Thermometer: Candy thermometers can lose their accuracy over time. Before you start, test yours by boiling a pot of water. Water boils at 212°F (100°C) at sea level. If your thermometer reads 210°F, you know it reads two degrees low, and you should adjust your target candy temperature accordingly (e.g., aim for 298°F instead of 300°F).
Safety First: Boiling sugar syrup sticks to the skin and causes severe burns. Keep children and pets away from the stove while you are boiling and pouring the candy. Have a bowl of ice water nearby just in case a drop splashes onto your hand.
Work Rapidly Off the Heat: Once your syrup reaches 300°F, it begins to cool and harden immediately. Have your flavorings, colors, and baking soda measured out and ready to go before you even start boiling the sugar. You have a window of about 30 seconds to mix everything in and pour it.
Clean Up Trick: Dealing with hardened sugar stuck to a saucepan can be a nightmare. The easiest way to clean your pot and thermometer is to fill the sticky pot with water, place the thermometer inside, and bring the water to a boil. The hot water will melt the sugar away completely, leaving your pot perfectly clean.
Exciting Flavor Variations
The base recipe is a blank canvas. By splitting your batches or making multiple batches, you can create a rainbow of flavors.
Tropical Citrus: Use orange food coloring and a mix of orange and lemon flavoring oils. Add a tiny pinch of lime zest to the fizzy sugar coating.
Sour Watermelon: Use pink/red food coloring and watermelon flavoring. For an extra sour kick, double the amount of citric acid in the sugar coating.
Cosmic Grape: Deep purple food coloring combined with classic grape flavoring oil. This is a nostalgic favorite that pairs beautifully with the tart fizz.
Storage: Protecting Your Candy from the Elements
The biggest enemy of any hard candy—and especially fizzy candy—is humidity. The moisture in the air will cause the candy to become sticky and will pre-activate the citric acid coating, ruining the popping effect.
Airtight is Key: Store your finished candies in a completely airtight container. Glass mason jars with tight-fitting lids work exceptionally well.
Use Desiccants: If you live in a humid climate, place a food-safe silica gel packet inside the storage jar. This will absorb any ambient moisture and keep your candies hard, dry, and popping for up to two weeks.
Do Not Refrigerate: The refrigerator is a very damp environment. Storing hard candy in the fridge will cause it to melt into a sticky puddle. Always store it in a cool, dark, dry pantry cupboard.
Making your own popping candy is an incredibly rewarding process. It demystifies a childhood favorite and allows you to create a personalized, delicious treat that brings a smile to everyone’s face. Gather your ingredients, watch that thermometer, and get ready for a deliciously fizzy adventure!